- Ready to add a video to your website? That`s awesome!
- Adding videos to your website is easy with the Elementor page builder`s video widget.
- With several customization options, the widget allows you to add videos without slowing down your website along.
- In this short article, we will discuss how to add a video to your blog post or page and set it up with the settings you need.

- The first step is to make sure you can open the page where you would like to add the video.
- At the top of the page, click on 'Edit With Elementor' so you can access the editor panel.

- This will open up the Editor Panel on the left of your page.
- Once on your page, access the Elementor widgets and search for “Video.”
- By the way, a widget is a modular element that enables you to add a specific feature to your website. Widgets can be added to different areas of a website, such as a website's sidebars or footer areas, and they're an inherent part of your website`s design and layout customizations.
- You can then drag and drop the video widget into your desired location, and you will then be able to access all the video options.
Choose the Video widget
The video options vary depending on the source you have added, whether you want to add an image overlay etc.
Video in Elementor - Sources & Edit Options
- Once you have added your widget for the video in Elementor, you can now add the content of the video and set up how it is going to display and show on the site.
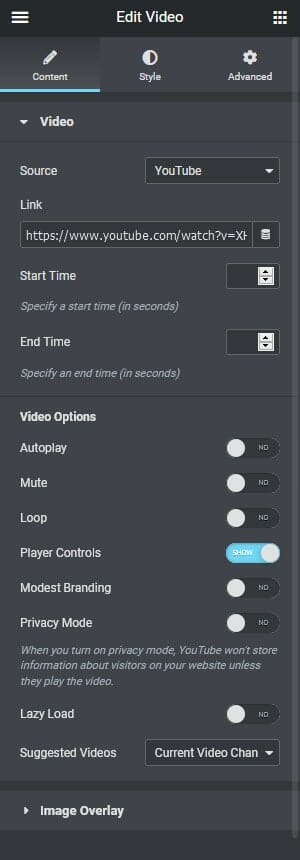
- You can select from a variety of options and settings depending on if you’d like the video to autoplay, have an image overlay, have sound, loop continuously, or load only when clicked.
Video
You can work your way through the list to adjust all the settings you need.
- Source – You will need to select the video you want to add from Youtube, Vimeo, Dailymotion and self Hosted (which can be from an external server).
- Link – Add the link to the video by either copying the URL from the address bar if you are using Youtube, Vimeo or Dailymotion, or alternatively you will need to copy the link from the Media Library if using a self-hosted video.
- Start Time – This is useful if you wish to avoid the opening credits or just to have the video start from a particular moment.
- End Time – Similar to Start Time this is useful to have the video end at a particular moment.
Video Options
The video options will vary slightly depending on which source you have selected, but they remain mostly the same.
- Auto-play – Selecting Yes will start the video playing once it has loaded.
- If you choose to auto-play you will also have the option of “Play on Mobile“.
- Mute – Remove the sound from your video.
- Loop – This will keep the video going round and round.
- Player controls – This removes the play, pause, and volume controls.
- Modest Branding – You can hide the Youtube logo from here.
- Privacy Mode – By default, Youtube will store information about the visitors, turn this on, so information is only stored if they play the video.
- Lazy Load – Delays the loading of the video until it is clicked.
- Suggested Videos – Choose the type of video to be suggested after this one is finished.
Image Overlay
- Note: If you add an image overlay to the video then this will override the auto-play on the video.
If you set the image overlay to Yes then you will have a new set of options.
- Image – You can set your new image overlay here. For the recommended image size we would suggest an image that is the same aspect as your video. If you are not sure something around 480 x 270 px (for a smaller video) up to 1920 x 1080 px (for full screen).
- Lazy Load – Replaces the video with a static image and play icon, if the user clicks then it will load the video, if the user does not click then the video is never loaded. This is a great way to speed up your page containing videos.
- Play Icon – You can turn the play icon on and off.
- Lightbox – You can choose to have the video play in its existing window or with the lightbox it will pop up and create a large box on the screen.
Style
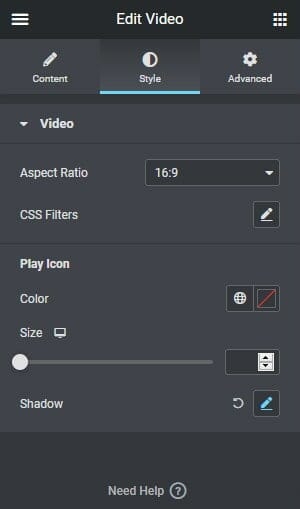
You can adjust the aspect ratio, add CSS filters, change the color and height of the play icon, and add a shadow under the icon here.
- Aspect Ratio – You can choose the aspect ratio that best suits your video and needs – 1:1, 3:2, 4:3, 16:9, 21:9, and 9:16
- CSS Filters – You can change the Blur, Contrast, Brightness, Saturation, and Hue.
- Play Icon – If you enabled the play icon then you have these extra options.
- Color – Set the color of your play icon.
- Size – Choose the size of it.
- Shadow – Set the shadow to make it pop a little more.
Advanced
The Advanced tab is full of useful features:
- Advanced – Options include; margin, padding, z-index, CCS ID and CSS Class.
- Motion Effects – There are a range of scrolling effects and mouse effects, and you can also choose how the selected element enters the screen, the delay and if it is sticky.
- Background – You can select the background for standard and also for hover. You can choose from a solid background and a gradient.
- Border – This allows you to add a border to the element when standard and hovers along with the border-radius. You can also add a box shadow.
- Positioning – You can change how the element is positioned on the page. For the page width, you have a default, inline, and custom. For the page position, you have a default, absolute, and fixed. Check out this article for a deep look into the positioning properties in Elementor.
- Responsive – The responsive options will allow you to hide certain sections or elements on different screen sizes. This can be useful when redesigning a page for mobile. On certain elements, you can reverse the columns.
- Attributes – (Pro Feature) You can add custom attributes to the element; you can find a full list here.
- Custom CSS – (Pro Feature) You can add CSS to the site or the element through this box. It is best to add the CSS for the element and add the CSS for the global setting site. You can use “selector” to target the specific element you have open.


